Working with NavLive Data in Trimble Connect
NavLive data can be sent to Trimble Connect in two different ways, depending on how you want to work with the scan data.
Some users simply want to export selected files so they can be shared, stored, or downloaded within a Trimble Connect project. Others prefer to create a SiteView project, which allows the NavLive scan data to be explored interactively within Trimble Connect.
1. Standard Export to Trimble Connect
Use this workflow when you want to send selected scan data files to Trimble Connect so they can be stored, viewed, shared, or downloaded.
This is the right option if you want to:
- share scan files with your team
- keep scan data inside a Trimble Connect project
- download files later from Trimble Connect
- work with exported files outside Trimble Connect, such as opening an SKP mesh in SketchUp
2. SiteView Export
Use this workflow when you want to create a SiteView project in Trimble Connect.
This sends the files needed for the NavLive SiteView extension, which lets you explore the scan in a more interactive way. In SiteView, you can view the NavLive point cloud, camera images, scan trajectory, and guide mesh together in one place.
This is the right option if you want to:
- navigate through the scan visually
- inspect images captured by the scanner along the scan path
- view the point cloud and mesh together
- use the NavLive viewer inside Trimble Connect
To use either workflow, you will need a Trimble account (Trimble ID). Visit trimble.com to get started if required.
Workflow 1: Standard Export to Trimble Connect
Use this workflow to send selected NavLive scan files to a Trimble Connect project. The chosen data will appear in Trimble Connect Explorer as project files, where it can be viewed, shared, and downloaded.
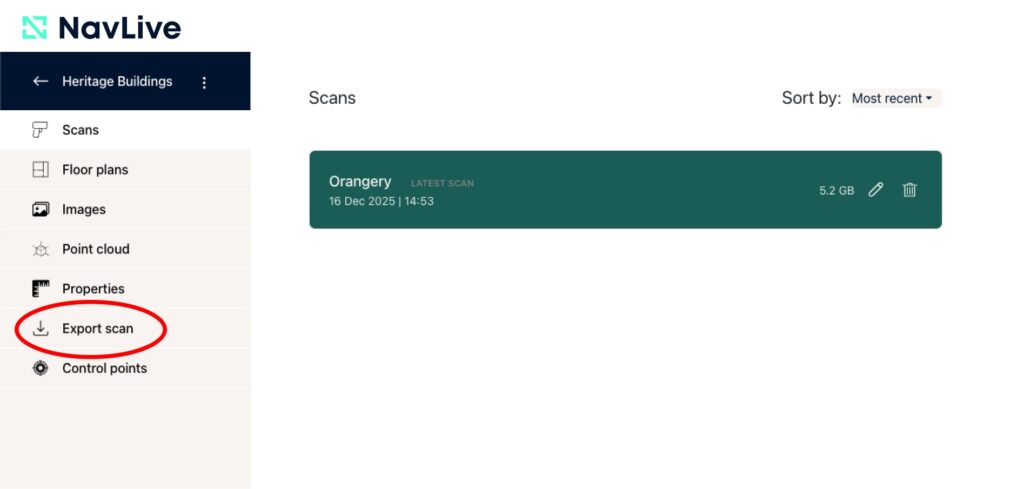
Step 1: Open the scan in the NavLive Portal
- In the NavLive Portal, go to the main Projects page.
- Select the scan you want to export.
- Click Export Scan from the left-hand menu.
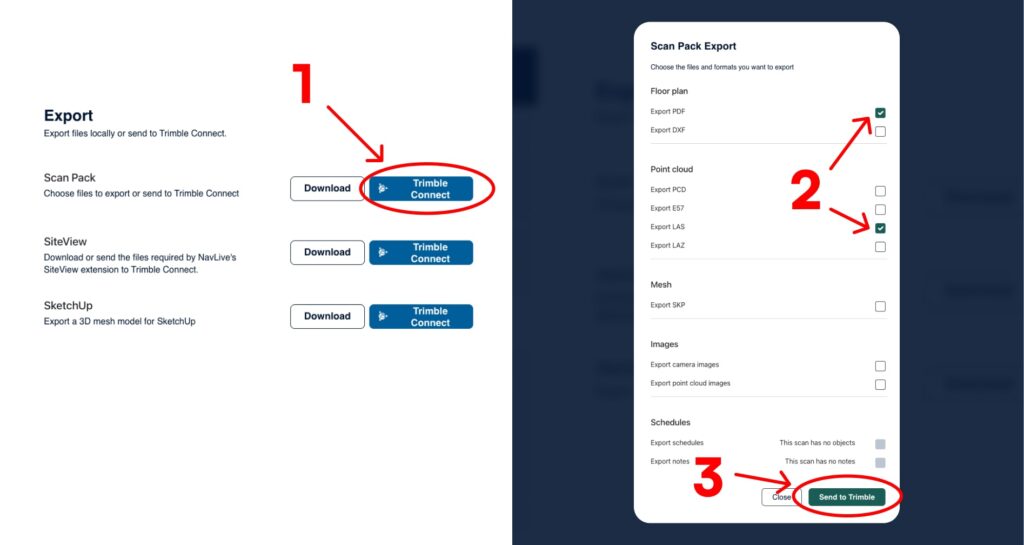
Step 2: Choose the Scan Pack export
- Find the Scan Pack export option and click Trimble Connect next to it.
- Choose the scan elements you want to include.
- Click Send to Trimble
Step 3: Sign in to Trimble
If you are not already signed in, you will be taken to the Trimble ID login page.
Once you have logged into Trimble through the NavLive Portal, the connection will remain active until you log out of the Portal.
Step 4: Choose a Trimble Connect project
After logging in, the Projects dialogue will appear. From here, you can either create a new project or export to an existing one.
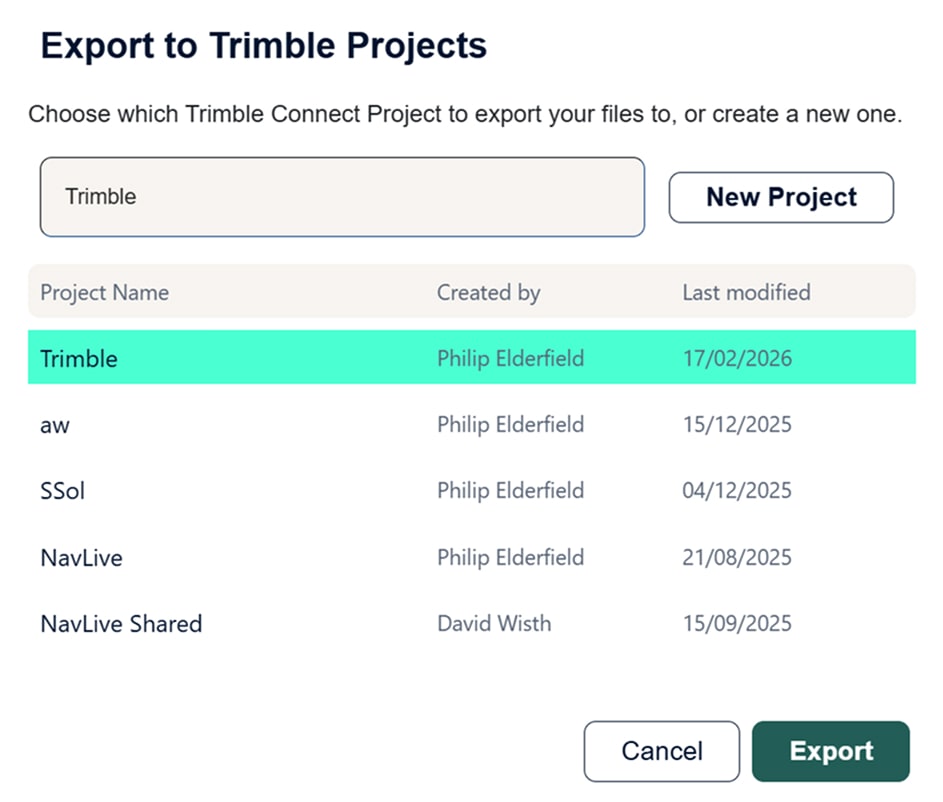
To create a new project:
- Enter a project name.
- Click New Project.
- Select the new project from the list.
- Click Export.
To use an existing project:
- Select the project from the list.
- Click Export.
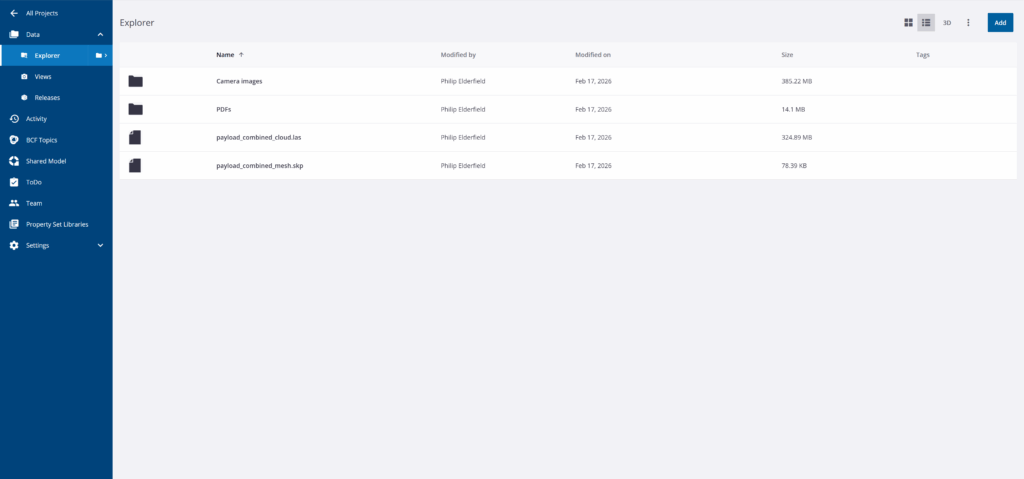
Step 5: Open the files in Trimble Connect
Once the export starts, click Go to Trimble to open the project in a new browser tab. Trimble Connect will open in Explorer view, where your exported scan files will appear.
Depending on the size of the scan, the upload may take some time. If all files are not visible straight away, wait a little longer and refresh the browser if needed.
Optional: Download files locally instead
On the NavLive export page, you can also use the Download buttons to save export files directly to your computer.
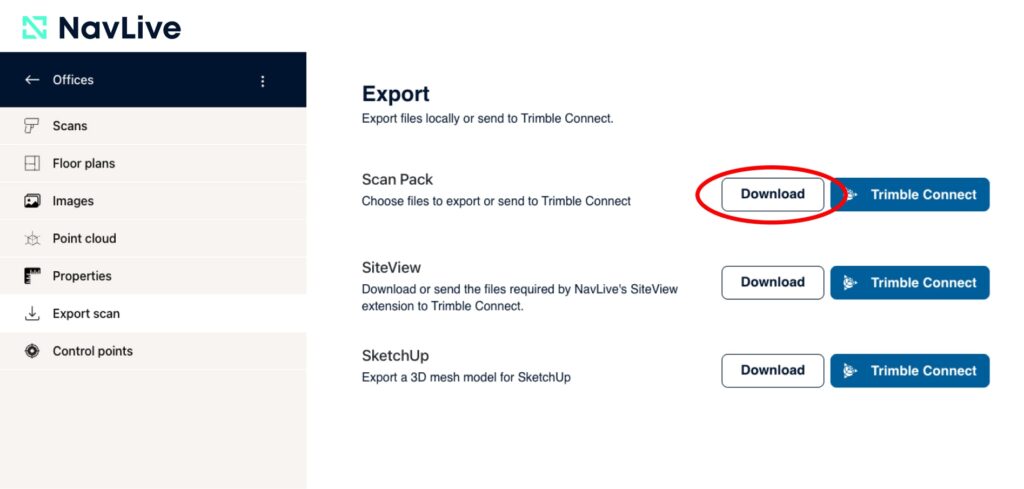
This is useful if you want to manage the files yourself or open them in another application, such as using the SKP mesh in SketchUp as a modelling reference.
Workflow 2: Creating a SiteView Project
Use this workflow when you want to view the scan in the NavLive SiteView extension inside Trimble Connect.
Choosing this option sends a specialised NavLive dataset to Trimble Connect for use with the SiteView viewer. Unlike the standard export, this workflow is designed for interactive scan review rather than general file access.
In SiteView, you can view:
- the point cloud
- the SKP guide mesh
- the scanner trajectory
- images captured by the scanner during the scan
Step 1: Open the scan in the NavLive Portal
- In the NavLive Portal, go to the Scans List.
- Select the scan you want to export.
- Click Export Scan from the left-hand menu.
Step 2: Choose the SiteView export
- Find the SiteView export option.
- Click Trimble Connect next to it.
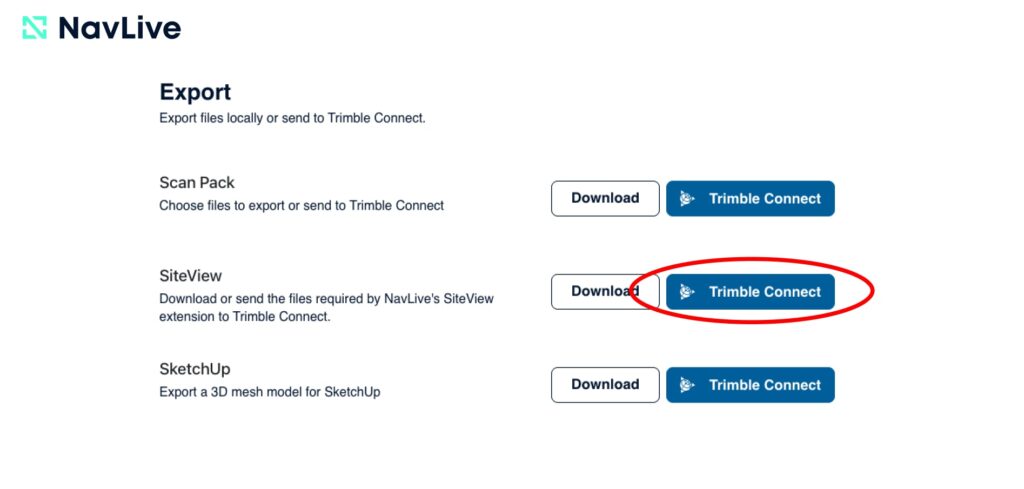
This will send only the files needed for SiteView.
Step 3: Sign in to Trimble
If you are not already logged in, you will be redirected to the Trimble ID login page.
Once signed in through the NavLive Portal, your Trimble connection will remain active until you log out of the Portal.
Step 4: Choose a Trimble Connect project
The Projects dialogue will then appear. You can either create a new project inside Trimble Connect, or use an existing one.
Step 5: Open the project in Trimble Connect
Once the export has started, click Go to Trimble. Trimble Connect will open in a new browser tab.
As with other exports, large datasets may take a little time to appear fully. If the project contents are incomplete at first, wait and refresh the page.
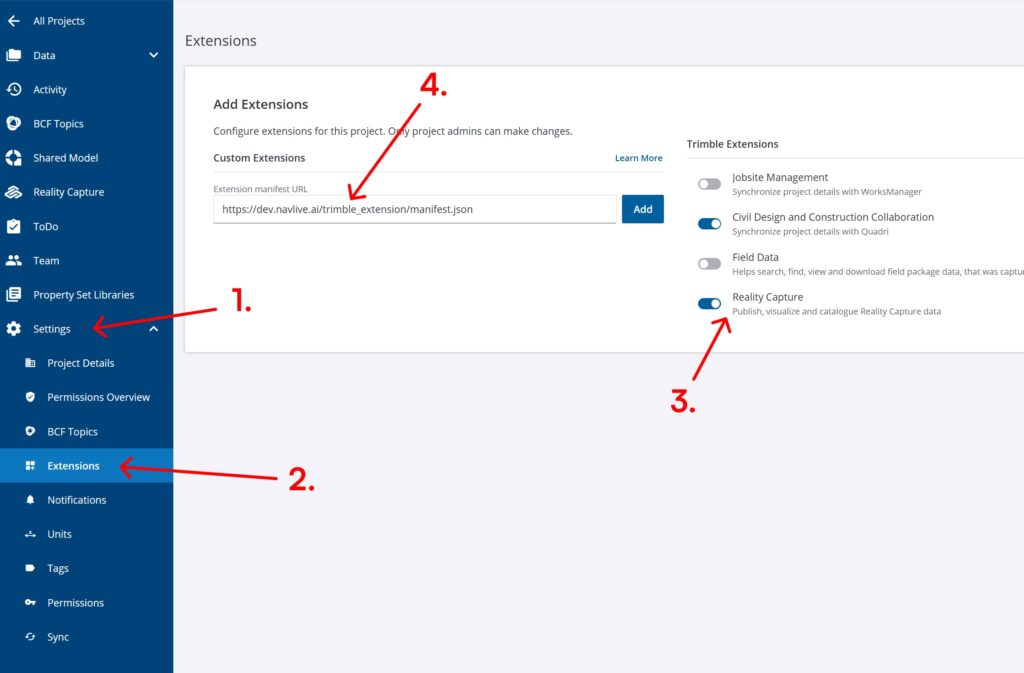
Enabling SiteView in Trimble Connect
Before you can view the scan in SiteView, you need to enable the NavLive extension in Trimble Connect. To open Extensions In Trimble Connect:
- Go to Settings
- Select Extensions
- Turn Reality Capture on
- Add the NavLive extension by entering the following into the Extension Manifest URL field:
https://portal.navlive.ai/trimble_extension/manifest.json
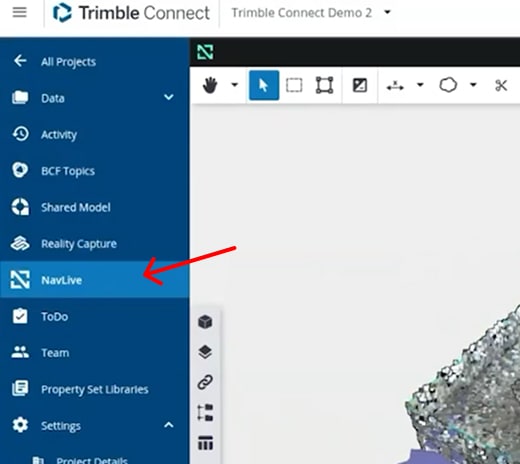
The NavLive extension will appear in the left-hand menu. You can now click the NavLive extension in the left-hand menu to launch SiteView.
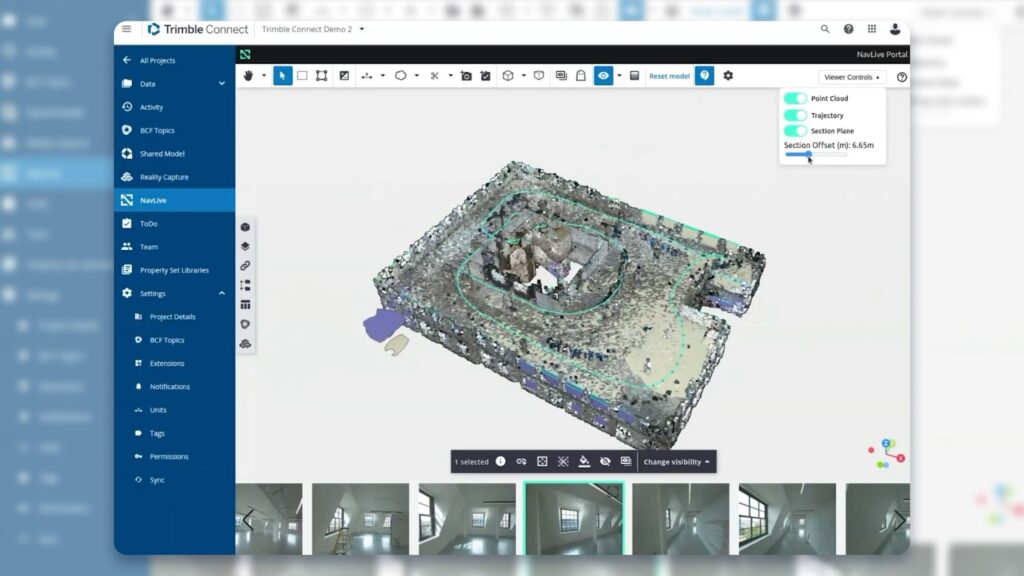
Viewing the scan in SiteView
Once the extension is open, you can load and navigate the scan data.
Load the model contents
- Click the Model button (cube icon) to the left of the viewer.
- From the dropdown menu at the top, select Everything in Project.
You will now see the available scan elements, including:
- the point cloud
- the SKP mesh
- the scanner trajectory
A 3D camera icon will appear at each point where the scanner captured an image.
Show or hide scan layers
Use the eye icons in the left-hand panel to show or hide the mesh or point cloud.
Use the viewer controls
In the top-right area of the viewer, you can control:
- the trajectory display
- the section plane
If the controls are not visible, click Viewer Controls.
When the section plane is enabled, use the slider beneath it to adjust its height.
Browse captured images
At the bottom of the viewer, you will see an image carousel showing the photos captured by the scanner along the scan path.
You can:
- drag along the image strip to move through the scan
- click an image to highlight its camera position on the trajectory
- click a camera position on the trajectory to jump to the matching image
To enlarge an image, click the expand control in the top corner of the image. Additional viewer tools are available above the image strip, with tooltips explaining each one.