Getting Started With NavLive

Editing Floor Plans

Once you've uploaded your scan to the NavLive Portal, you can edit your AI-generated floor plan drawings directly, without needing to export to a third-party tool first.

Our built-in floor plan editor lets you add, remove or adjust walls, doors, windows, surfaces and more, and even add furniture and finishes.

This guide walks you through opening the editor, making changes, saving your work and applying your edits back to your AI drawings.

Note: This guide covers the essentials for working with the editor from within the NavLive Portal. For a full reference of every drawing tool available, use the Help Centre link inside the editor itself.


Step 1: Open the floor plan editor

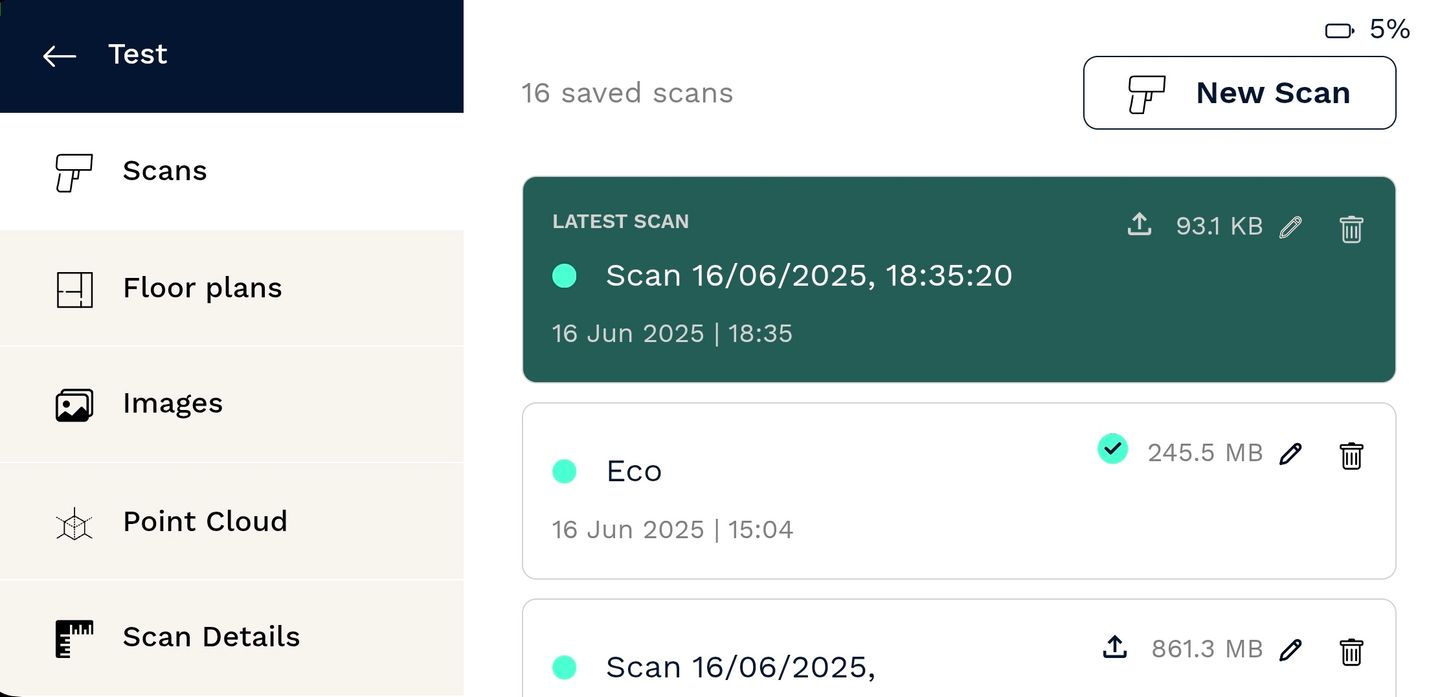
  1. Select Scans from the left-hand menu, then click the scan you want to work with.
  2. Click Floor Plans in the left-hand menu.
  3. Click the Edit button in the top-right corner.

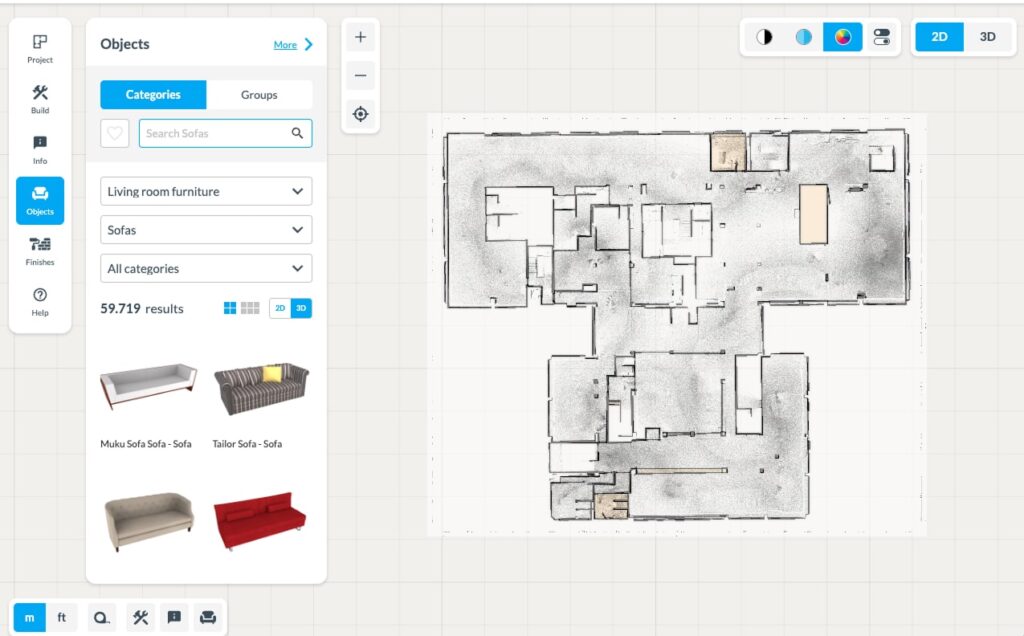
The editor will take a moment to load depending on the size of your scan, with larger scans taking a little longer. Once it’s ready, you’ll see your floor plan image with the AI-generated surfaces drawn over the top.

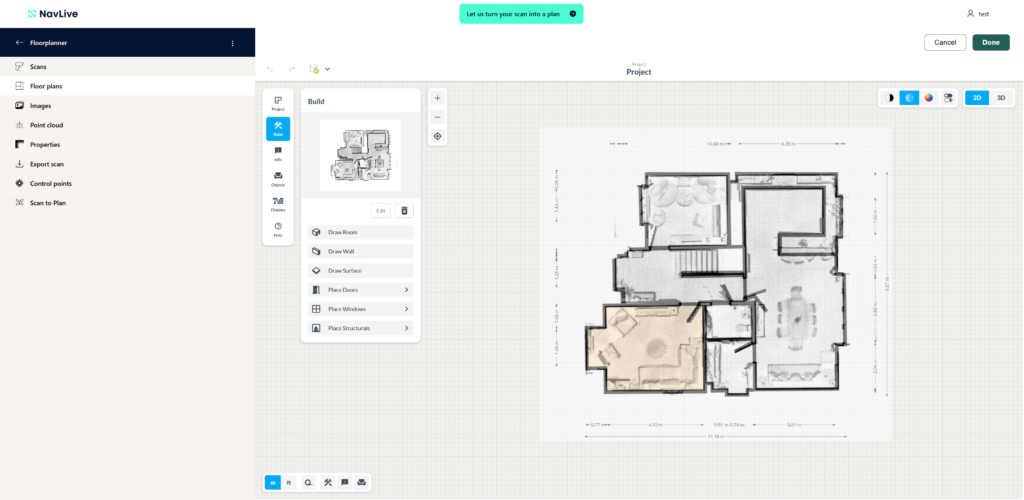
By default, you’ll be in Build mode, with the Build menu displayed on the left-hand side of the screen.


Step 2: Get your bearings

Before you start editing, it’s worth familiarising yourself with the editor layout.

Navigating the canvas

Use your mouse to pan and zoom around the drawing. There are also zoom and recentre buttons on the right-hand side of the Build menu. Press B on your keyboard to toggle the background floor plan image on or off.

Working on multi-storey buildings

If your scan covers more than one floor, click Project and select the floor you want to work with.

Understanding shaded areas

Shaded areas in the drawing indicate that all surrounding walls are closed, forming a complete room with a floor.
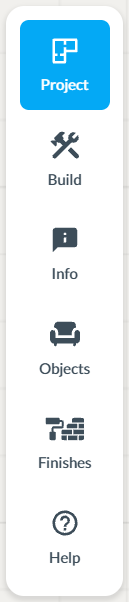
The main menu

The menu on the far left of the screen gives you access to project-level settings, annotation tools, furniture and non-structural objects, and surface finishes. You can also find keyboard shortcuts and the Help Centre link here.

The main menu

Undo, Redo and Save

These buttons are available in the top-left corner of the canvas.


Step 3: Edit your floor plan

Use the Build menu on the left to add new elements — rooms, walls, surfaces, doors, windows and other structural features.

Selecting and editing walls

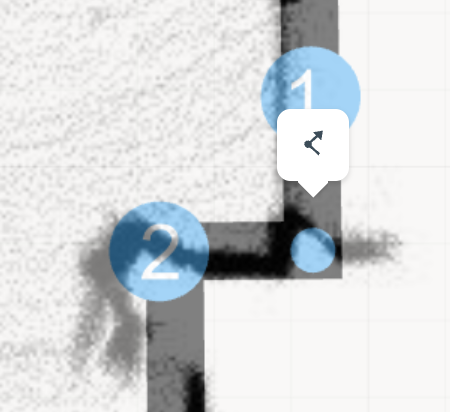
Click on a wall to select it. Once selected, you can move it, split it, extend it or carry out other edits. Relevant options will appear automatically when a wall is selected.

Selecting and editing walls

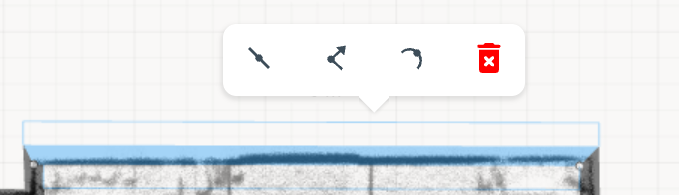
Hover over or click the end of a wall to reveal a handle. You can drag this handle to reposition that end of the wall, or use it as a starting point to draw a new wall continuing from there.

Selecting and editing walls

Adding furniture and finishes

Use the main menu on the far left to place furniture and other non-structural objects, or to apply materials and finishes to surfaces.

Note: Furniture, finishes and other non-structural objects will not be included when your edits are applied back to your AI drawings or exported as a DXF file.


Step 4: Save your work

Your design is automatically saved as you work, so you won’t lose any progress.

You can also use Save As to save a named version of your design at any point. Named versions are stored under Project > Active Designs, where you can browse and revert to earlier saves if needed.


Step 5: View in 3D (optional)

Selecting and editing walls

The editor includes a 3D view that lets you visualise your floor plan as a three-dimensional space. Your 2D surfaces are automatically extended upward to create walls and structure.

Note: The 3D view is for visualisation only. 3D geometry and models cannot currently be exported.

To view all surfaces in 3D:

  1. Click the 3D View Settings button in the top-right corner.
  2. Toggle off Cutaway Walls to display all surfaces.

Various camera settings are also available in this view.


Step 6: Finish and apply your edits

When you’re happy with your changes, click Done in the top-right corner.

Editing done

You’ll be returned to the Portal’s Floor Plans screen. The Edit button will indicate that processing is underway while your changes are applied to your AI drawings.

You don’t need to stay on this screen. You can navigate anywhere in the Portal and processing will continue in the background. A notification will appear in the bottom-right corner of the screen when it’s complete.

Processing complete

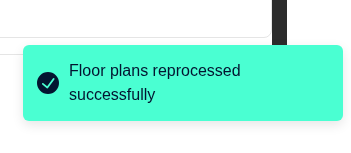
Once processing is finished, your updated drawings are available via the AI Drawings toggle and can be exported as DXF polylines.


Exiting without applying changes

If you want to exit the editor without applying your edits to your AI drawings, click Cancel in the top-right corner instead of Done.

Your work will still be saved within the editor, so you can return and pick up where you left off at any time.

Next NavLive User Guide

Frequently Asked Questions

When you turn on the phone that ships with your NavLive Scanner, it will automatically begin searching for your scanner.

While it’s connecting, you’ll see a connection screen with a countdown timer and some quick troubleshooting tips. This screen will stay visible until the NavLive Scanner and phone are successfully connected.

Once connected, you’re ready to assemble the NavLive Scanner, attach the phone, and begin scanning.

For full setup instructions, including assembly and connection steps, see our Setup Guide.

Starting a scan is simple:

  • Tap New Scan from the left-hand side of the Home screen,
    or tap the + icon at the top right of the Scans screen within a project.

If you’re starting from the Home screen, you’ll be prompted to select an existing project or create a new one.

Once your project is selected:

  • Tap Start to begin the scan.

For best results, hold the NavLive Scanner steady while the scan initialises.

You’ll know the scan has started when:

  • The right side of the screen shows the live camera view from the front-facing camera.

  • The left side begins to show a 3D point cloud — a live visualisation of the space you’re capturing, built from thousands of sample points.

Now, simply walk through the space, keeping the NavLive Scanner pointed toward the areas you want to capture. Watch the point cloud build in real time to track your coverage.

When you’re finished:

  • Tap Stop at the bottom left of the screen.

  • Your scan will process automatically (this may take a few minutes depending on its size), then appear in the Scan List for your project.

See Getting Started With A Scan for a full walkthrough of the scanning process.

Once your scan has been saved, you can view it in the Scans List for the project it belongs to. This list includes all scans associated with that project, with the most recent shown at the top.

To upload your scan to the NavLive Portal for viewing and exporting:

  • Tap the Upload icon on the scan tile.

After completing a scan, you can upload it to your NavLive Portal directly from the phone interface. Just tap the Upload icon next to the scan you want to send.

Once the scan is uploaded, log in to your Portal to export the data in a variety of formats—ready for use in your design, documentation, or BIM workflows.

After you’ve uploaded your scan to the NavLive Portal, you can export your data in several industry-standard formats:

  • 2D Drawings: Export AI-generated floor plans as .dxf or .pdf files

  • 3D Point Clouds: Export as .las or .pcd files

Once exported, you can open and edit these files using your preferred design software—such as AutoCAD, BricsCAD, SketchUp, or DraftSight. The exported data includes AI-generated floor plans, plan and elevation slices, and the full 3D point cloud.

Need assistance? There are also service providers who can help create or refine plans for you. To learn more, email us at customersupport@navlive.ai.

As you scan, the NavLive Scanner captures images automatically from the three high-resolution cameras (front, left, and right) every 2 meters or approximately every 25 degrees rotation. These images are then available for review in the Images and Route View sections of the output.

To upload your scan output, the NavLive Scanner needs to be connected to a data network.

You have two options:

  • Connect to WiFi:
    Open the phone’s WiFi settings, select your preferred network, and then return to the NavLive app.

  • Use mobile data:
    If WiFi isn’t available, you can insert a data-enabled SIM card into the phone. Then use the phone’s system settings to connect to your mobile service provider’s network.

In a controlled environment, the NavLive Scanner can achieve measurement accuracy between 1cm and 2cm. Actual accuracy may vary depending on environmental conditions and scanning technique.

A point cloud is a 3D representation of the space you’ve scanned using the NavLive Scanner. It consists of thousands or even millions of individual points, each captured as the scanner samples its surroundings. The colour of each point is derived from the images taken during the scan, providing a realistic view of the environment.

This rich visual output helps you—and your team or clients—understand the space quickly and clearly. You can view the point cloud on your phone immediately after the scan, or upload it to your NavLive Portal where it can be viewed, exported, and shared as .las or .pcd files. These formats are compatible with 3D software packages, allowing you to generate floor plans, elevations, and BIM models.

While scanning with the NavLive Scanner, you can log a window or door by either:

  • Pulling the trigger on the handle

  • Or tapping the Log Object button on the bottom right of the Scan screen

This will capture the location and dimensions of the opening, which will be added to your AI Drawings (see Floor Plans for more on this feature).

For a full walkthrough, see Capturing Building Objects.

Yes! You can add a note at any time during a scan by tapping the Add Note button on the Scan screen (bottom left), or by pulling the trigger twice quickly.

Each note is saved with an image and pinned to the exact location it was recorded.

For full instructions, see Adding Notes.

We recommend shutting down your NavLive Scanner as soon as you’ve completed all your scans and uploaded them to the Portal.

There are three ways to shut down the device:


1. Soft Shutdown via the App (Recommended)

  1. Tap the Settings icon at the top left of the Home screen.

  2. Select Shutdown Device from the Settings menu.


2. Soft Shutdown via Power Button

You can also shut the device down using the Power Button on the bottom rear of the scanner:

  • Press the button once to trigger a shutdown confirmation popup.

  • Confirm to shut the scanner down.


3. Forced Shutdown (Only if Unresponsive)

If the scanner becomes unresponsive, you can perform a hard shutdown:

  1. Press and hold the Power Button for 12 seconds.

  2. Around the 8-second mark, a confirmation popup will appear:

  3. Keep holding to proceed with the shutdown, or release the button to cancel.

After 12 seconds, the scanner will power off completely and can be restarted.

⚠️ Any scans captured before shutdown should be saved. If you have trouble accessing them, contact NavLive Support at customersupport@navlive.ai.

The NavLive Scanner features three high-resolution cameras—positioned on the front, left, and right. Each camera captures images at a resolution of 1456 × 1088 pixels.

You can export your scan outputs from the NavLive Portal in the following formats:

Floor Plans:
• .dxf
• .pdf

3D Point Cloud:
• .las
• .pcd

For optimal scan quality, the NavLive Scanner has a maximum effective range of 60 metres.

The NavLive app is built for Android and may run on other Android phones. However, we currently only support the NavLive app on the phone supplied with your scanner.

Additionally, the app is not available via the Play Store or any public download site. It comes pre-installed and configured on the supplied device.

While it is technically possible to use the phone for general smartphone functions, we do not recommend or support this. The phone is configured specifically for use with the NavLive Scanner, and we do not provide support for any other features, apps, or phone-related issues outside the NavLive system.

The NavLive Scanner generates point cloud data at a resolution of approximately 1 point per centimetre, or around 1 million points per cubic metre. This provides a detailed and accurate 3D representation of the scanned space.

The battery provides approximately 1 hour of scanning time before full depletion. However, we recommend swapping the battery when it reaches 10–20% to avoid interruptions.

A low battery warning appears at 20%, and the device will automatically shut down at 6%.

The current battery level is always shown in the top right corner of the phone screen—unless the NavLive Scanner is connected to mains power via the battery charger, in which case a power icon is shown instead.

Note: This battery icon shown on the top-right of the phone refers to the scanner’s battery, not the phone’s battery.

To replace the battery:

  1. Press the black release button on the side of the NavLive Scanner.

  2. Slide the battery housing forward to expose the battery.

  3. Swivel the two battery retainers upward and outward.

  4. Lift and slide the battery out from the rear of the housing.

  5. Insert the new battery and reverse the steps to secure it in place.

⚠️ Important: Do not remove the battery while the scanner is powered on.
This may damage your NavLive Scanner and result in data loss. If this occurs, contact us at customersupport@navlive.ai — we may be able to help recover your data.

Yes — but only under the right conditions.

You can safely hot-swap the battery (replace it while the scanner is powered on) only if:

  • The supplied charger is connected to the scanner, and

  • The charger is plugged into a switched-on mains power supply.

This temporary power connection will keep the device running while you swap batteries.

⚠️ Warning:
Do not attempt to change the battery without an external power supply connected. Doing so risks damage and potential data loss.

We strongly recommend removing the battery from the NavLive Scanner after powering it down, especially when transporting or storing the device. This helps protect the battery, prevent accidental power-on, and reduce the risk of damage during travel.

If you need help or have any questions, you can reach the NavLive Customer Support team by emailing:
📧 customersupport@navlive.ai

Schedule your NavLive demo

Schedule a NavLive demo

In this initial 15-minute call, we'll:

  • Gather some quick info about your current surveying workflows.
  • Answer any questions you have about NavLive.
  • Schedule an in-person site visit to demo the NavLive scanner at your office.